


기본 설정(EC2, 보안그룹)은 아래 글에서 설정하고 오자
Zabbix란? Zabbix 설치 준비 (Active 방식)
설정 후 Server용 CentOS 8에 접속하자
1. httpd, mariadb 설치
sudo -i
dnf install -y httpd mariadb mariadb-devel mariadb-server
먼저 root 권한으로 들어간 다음, zabbix server 설치에 필요한 httpd와 mariadb를 설치한다

2. Zabbix 설치
다 되었으면 zabbix를 설치해준다
rpm -ivh https://repo.zabbix.com/zabbix/5.0/rhel/8/x86_64/zabbix-release-5.0-1.el8.noarch.rpm
dnf clean all
dnf -y install zabbix-server-mysql zabbix-web-mysql zabbix-apache-conf zabbix-agent
본인 CentOS 버전에 맞는걸로 찾아 깔아야한다(현재는 8버전으로 진행중)
dnf clean all은 캐시 패키지를 제거하는 명령이다

3. mariaDB 설정
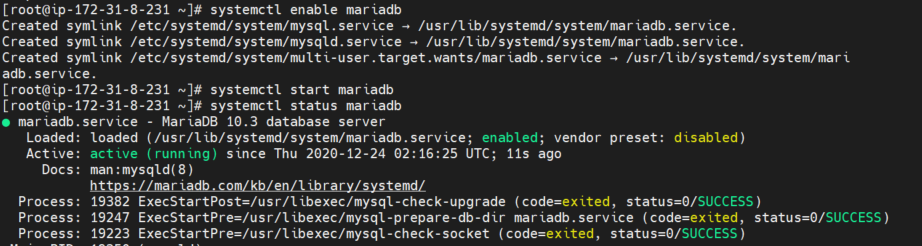
mariaDB에 접속하기 위해 start, enable을 해주자
systemctl enable mariadb
systemctl start mariadb
start는 system을 지금 바로 시작하는 것이고, enable은 재부팅 시 자동으로 시작하게 해주는 것이다
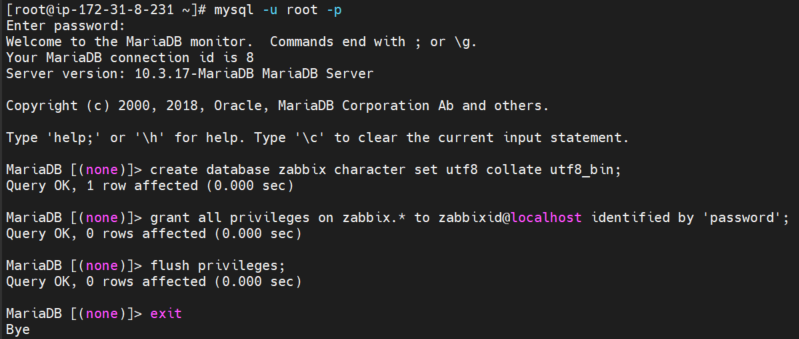
이제 mariadb에 접속해서 필요한 설정을 해주자
mysql -u root -ppassword 치라고 하면 없으니까 엔터 쳐주면 된다
create database zabbix character set utf8 collate utf8_bin;
grant all privileges on zabbix.* to zabbixid@localhost identified by 'password';
flush privileges;
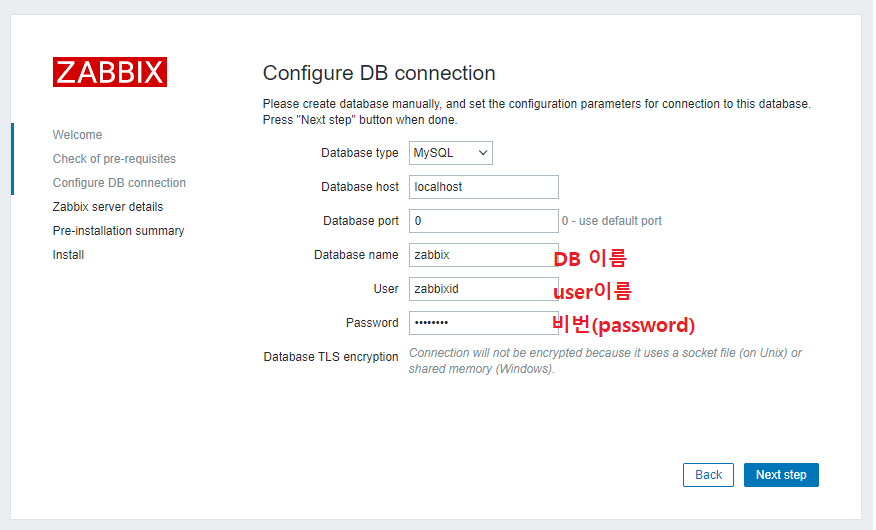
exitzabbix라는 DB를 만들고, 사용자의 id와 비번을 zabbixid, password로 설정해 주었다
DB이름과 사용자id, 비번은 원하는 걸로 바꿔도 된다
그리고 flush로 변경사항을 적용한 뒤 exit로 나오면 된다
이제 zabbix의 기본 테이블을 만들어줘야 한다
zcat /usr/share/doc/zabbix-server-mysql*/create.sql.gz | mysql -u zabbixid -p zabbix본인 id와 DB이름에 맞게 설정해준 후, 위에서 설정한 비밀번호(password)까지 쳐주면 된다
그러고 다시 mariadb에 접속해보면 엄청 많은 테이블들이 생성된걸 확인할 수 있다

4. Zabbix 설정들 변경
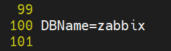
4-1) vi /etc/zabbix/zabbix_server.conf
 91 DBHost=localhost				#주석 제거
100 DBName=zabbix				#DB이름 작성
116 DBUser=zabbixid				#user이름 작성
124 DBPassword=password				#주석제거 후 password 작성


4-2) vi /etc/php-fpm.d/zabbix.conf
php_value[date.timezone] = Asia/Seoul맨 마지막 줄의 주석(;)을 제거한 후 timezone을 Asia/Seoul로 바꿔준다

4-3) vi /etc/selinux/config
SELINUX=disabledenforcing을 disabled로 바꿔준다

5. 시스템 시작
systemctl enable zabbix-server
systemctl enable zabbix-agent
systemctl enable httpd

reboot
zabbix-server, zabbix-agent, httpd를 enable해둔 후 재부팅을 하면 된다


+) AWS가 아닌 경우
AWS로 진행하면 보안그룹으로 포트를 열어두지만 아닌 경우엔 firewall을 사용한다
dnf install -y firewalld
systemctl enable firewalld
systemctl start firewalld

firewall-cmd --zone=public --add-port=80/tcp --permanent
firewall-cmd --zone=public --add-port=10050/tcp --permanent
firewall-cmd --zone=public --add-port=10051/tcp --permanent
firewall-cmd --zone=public --add-port=3306/tcp --permanent

firewall-cmd --reload
6. Zabbix 접속
zabbix 서버 설치는 끝났다(리부팅이 끝나면)
http://서버 퍼블릭 IP/zabbix

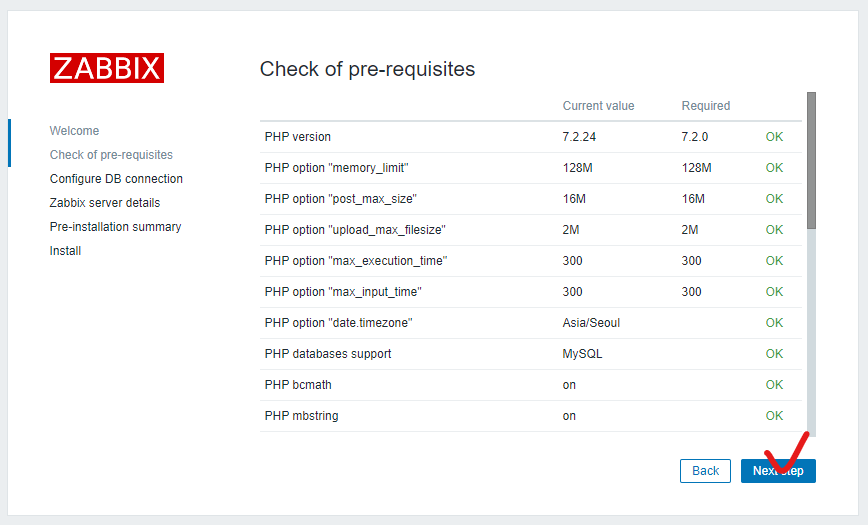

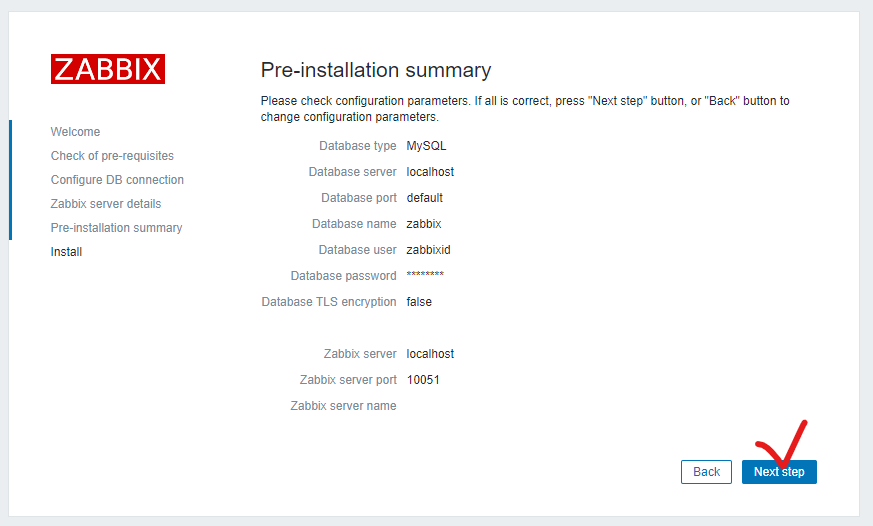
지금까지의 설정을 검토해준 후, Next step > Finish까지 누르면 로그인 창이 뜬다

초기 id/비번 : Admin/zabbix
로그인하면

자빅스 서버 접속이 끝났다
설정을 한국어로 바꾸고 싶으면 Administration > Users > Admin > Language를 Korean으로 바꾼다

그러고 Update를 누르면 한국어로 바뀌어있다
Agent를 만들고 등록하는건 아래 글들에서 하자
CentOS 8에서 Active 방식으로 Zabbix Agent 설치
Windows Server 2019에서 Active 방식으로 Zabbix Agent 설치
Passive 방식으로 Zabbix Agent 설치 (CentOS 8, Windows Server 2019)
'공부 > Monitoring' 카테고리의 다른 글
| [Zabbix] Disk Monitoring 설정하기 (0) | 2020.12.28 |
|---|---|
| [Zabbix] #4 Passive 방식으로 Zabbix Agent 설치하기(CentOS 8, Windows Server 2019) (0) | 2020.12.24 |
| [Zabbix] #3 Windows Server 2019에서 Zabbix Agent 설치 후 Server에서 호스트 등록하기(Active 방식) (0) | 2020.12.24 |
| [Zabbix] #2 CentOS 8에서 Zabbix Agent 설치 후 Server에서 호스트 등록하기(Active 방식) (0) | 2020.12.24 |
| [Zabbix] #0 Zabbix란? Zabbix 설치 준비 (Active 방식) (2) | 2020.12.24 |


댓글